The Office of Digital Humanities schedules several labs, meeting rooms and classrooms. The Scheduler program was developed to manage the scheduling of these rooms.
If you have any questions, or want to add rooms that you schedule to this system, contact Devin Asay.
Enter the appropriate URL in your web browser, or click the appropriate link below.
Mac: https://humrooms.byu.edu/downloads/Scheduler2.3_osx.dmg.zip
Windows: https://humrooms.byu.edu/downloads/Scheduler2.3_Install.exe
Mac:
Win:
Linux (64 bit):
Mac:
Find Scheduler in the Applications folder and double click. The first time you launch Scheduler you may see a message like this: "Scheduler can't be opened because it is from an unidentified developer." (That just means I didn't bother to go through the process of getting a security certificate from Apple for this application--a common practice for in-house apps.) To launch the application, right click the Scheduler icon and choose Open. In the ensuing dialog box, click Open and Scheduler will launch. You only have to do this the first time you launch the program. See this web site for more information.
Windows:
The install wizard will let you choose to launch Scheduler after it is installed. It will also create a shortcut in your start menu and, optionally, on your desktop. You can launch Scheduler using either of these shortcuts.
Linux:
Find the executable file named Scheduler and double click.
Scheduler is designed to be simple to use, but here are a few notes to get you going:
Once it’s installed launch the application and after a few moments you’ll see the scheduling screen. It will be blank until you choose a room to view under Choose Room:
You can see the schedule for any of our College rooms that we schedule via this app, but you and your team will only be able to schedule the ones that are assigned to your department or area.
To enter scheduling mode, click Enable Scheduling. (Note: In order to be authorized to change the schedule for your rooms you need to contact Devin Asay.)
Enter your Net ID when prompted. Enter the password you got when you were authorized to use the program.
Once you are authenticated you can initiate a scheduled event by simply clicking on any blank space in the schedule grid. You’ll see a dialog that looks something like this:

A Repeating Event will default to starting on the first day of the semester you clicked in on the calendar and ending on the last class day of the semester you clicked in. However, you can also select custom dates.
(When scheduling a repeating event, if there is a conflict any time during the date range, it will report that to you.)
A One Time Event will schedule for the date you clicked only.
Once you’ve done that just fill in the form:
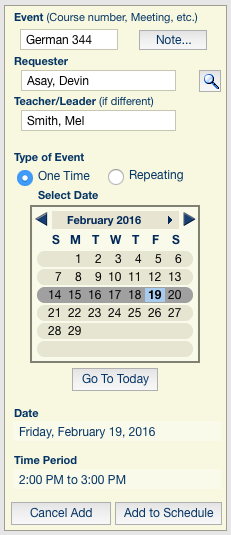
Event is usually the Course number or name of the study group or something similar.
The Note… button lets you add any information you need to attach to the event.
The Requester is usually going to be the person who is entering the event. I often find it helpful, if a department secretary makes a request for an instructor, to enter that person’s name. You can enter either a name or net ID here, and Scheduler will verify it against a database of BYU persons.
The Teacher/Leader is the person who is actually going to be in the room in charge of the event.
Change the date by clicking a date in the calendar or on a different day in the schedule grid.
Set the starting and ending times of the event by clicking adjacent blank spaces in the schedule grid. Change the time of the event by clicking any non-adjacent cell on the grid.
Once you have entered all of the information, click Add to Schedule, or press Command/Control + S.
To Change or Delete an existing event, just click on that event in the schedule grid. You should see Delete and Edit buttons appear on the bottom left of the screen.
Please contact Devin Asay if you need any help using the Scheduling app.